| 일 | 월 | 화 | 수 | 목 | 금 | 토 |
|---|---|---|---|---|---|---|
| 1 | 2 | 3 | ||||
| 4 | 5 | 6 | 7 | 8 | 9 | 10 |
| 11 | 12 | 13 | 14 | 15 | 16 | 17 |
| 18 | 19 | 20 | 21 | 22 | 23 | 24 |
| 25 | 26 | 27 | 28 | 29 | 30 | 31 |
- extension
- String
- initializer
- Git
- Terminal
- UIKit
- Unicode
- 이니셜라이저
- Swift
- struct
- interpace
- IOS
- enum
- Method
- property
- instance
- url
- delegate
- 디자인패턴
- Foundation
- tuist
- initalizer
- type
- init
- Protocol
- 코딩테스트
- Xcode
- Class
- 스위프트
- optional
- Today
- Total
아리의 iOS 탐구생활
[iOS/UIKit] Alert 알림창을 만들어보자 본문
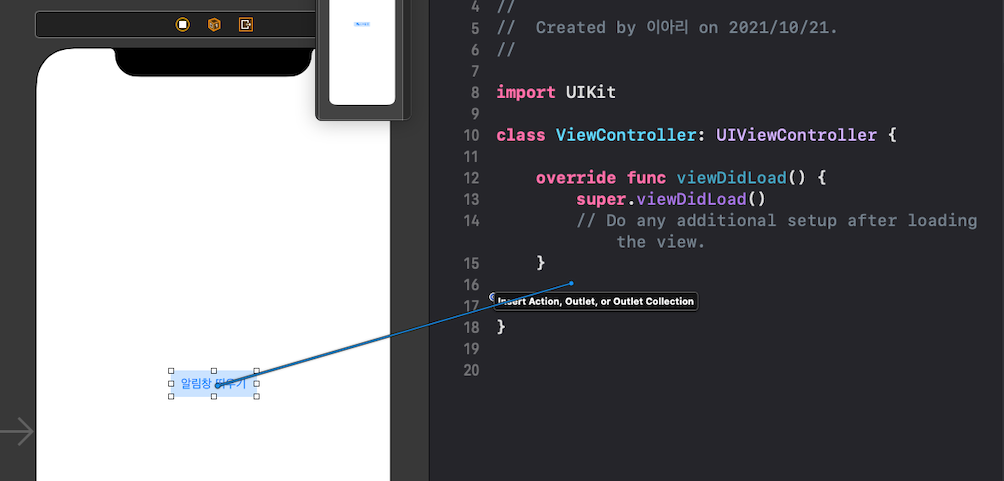
# IBAction 만들기
- 버튼을 Ctrl을 누르면서 코드쪽으로 드래그하면 된다.

- Name칸을 채워주고, Type을 UIButton으로 설정해준 뒤 Connect 버튼을 클릭해준다.

- 그럼 이러한 함수가 뙇! 생기는데 이 내부에다가 코드를 적어줄 것이다.

## Alert 제목과 메세지내용 만들기.
let alret = UIAlertController(title: "알림", message: "알림창 내용", preferredStyle: .alert)위와 같이 UIAlertController를 이용하여 파라미터를 채워준다. preferredStyle은 아래와 같이 두가지가 있다.
- Alert

- actionSheet

## Alert에 들어갈 액션버튼 만들기
위 사진과 같은 Yes, No 같은 버튼을 따로 구현해줘야 한다.
let yes = UIAlertAction(title: "Yes", style: .default, handler: nil)
let no = UIAlertAction(title: "No", style: .destructive, handler: nil)
style
- cancel과 default는 글씨 굵기 빼고 동일하다.
- destructive는 빨간 글씨로 표시된다
handler
- 버튼을 눌렀을 때 실행해야하는 행동을 추가하는 부분이다. 추가를 하겠다면

- 이 파란색 부분에서 엔터를 치면

- 이렇게 클로저가 생기는데 내부에 코드를 작성해주면 된다.
나는 아무것도 안할거기 때문에 nil을 넣어주었다.
## 만들어준 UIAlertController와 UIAlertAction을 연결해주기
지금까지 alert의 제목과 메세지, 그리고 액션버튼을 만들어주었다.
이것들을 합쳐주는 작업이 필요하다.
alret.addAction(no) alret.addAction(yes)
이렇게 말이다.
## alert view를 화면에 뜨게 만들어주기
present(alret, animated: true, completion: nil)Present 메서드를 통해서 alert을 뜨게 만들어준다.
animated
animated를 true하면 애니메이션 같이 부드럽게 뜨고, false로 하면 그냥 빡!!! 하고 나타난다.
잘 모르겠다면 true, false를 바꿔가면서 테스트 해보자.
completion
이것도 위에서 봤던 핸들러랑 같은 의미의 파라미터다.

completion을 위와 같은 방법으로 엔터를 친다면 위와 같이 클로저가 생기면서 코드를 적을 수 있다.
해당 alret이 성공적으로 수행되고 나서 이 함수가 끝난 뒤 뭘 할거냐? 라고 지정해주는 부분이라고 보면 된다.
# 요약
- 만들고 싶은 alert을 만든다
let alret = UIAlertController(title: "알림", message: "알림창 내용", preferredStyle: .alert) - 액션 버튼을 만든다.
let yes = UIAlertAction(title: "Yes", style: .default, handler: nil) let no = UIAlertAction(title: "No", style: .destructive, handler: nil) - alert 컨트롤러와 내가 만든 액션버튼을 addAction 메서드를 이용해서 바인딩해준다.
alret.addAction(no) alret.addAction(yes) - present 한다.
present(alret, animated: true, completion: nil)
# 주의해야할 점
- alert에 추가하는 순서대로 왼쪽부터 나타나게 된다.
alertAction을 만드는 순서는 상관없고 추가하는 순서가 중요하다. - UIAlertController 안에 UIAlertActionStyle이 cancel인 액션버튼이 두개이상 들어갈 수 없다.
- 액션버튼을 두가지 이상으로 사용하고 싶다면 .alert 대신 .actionSheet style을 사용한다.
# Full Code
@IBAction func printAlret(_ sender: UIButton) {
  let alret = UIAlertController(title: "알림", message: "알림창 내용", preferredStyle: .alert)
  let yes = UIAlertAction(title: "Yes", style: .default, handler: nil)
  let no = UIAlertAction(title: "No", style: .destructive, handler: nil)

  alret.addAction(no)
  alret.addAction(yes)

  present(alret, animated: true, completion: nil)
}
Reference
Apple Developer Documentation
developer.apple.com
Apple Developer Documentation
developer.apple.com
왕초보를 위한 iOS 앱개발 - 야곰닷넷
코딩의 '코'자를 몰라도 시작해 볼 수 있는 iOS 앱만들기! 왕초보를 위한 iOS 앱개발 입문편입니다.
yagom.net
iOS ) 왕초보를 위한 Alert View사용해보기 (2/3)
저번시간에 Alert에 대해서 이론적인? 설명만을 했는데, 오늘은 직접 써보는 시간을 가질거에요 :) 간단하게 어떤 버튼을 누르면 딱!!하고 Alert View가 나타나는 그런 간단한 앱을 만들어볼게요. 어
zeddios.tistory.com
'Swift > iOS' 카테고리의 다른 글
| [iOS/UIKit] ViewController와 종류 (0) | 2021.10.22 |
|---|---|
| [iOS/UIKit] Storyboad Segue에 대해서 알아보자 (0) | 2021.10.21 |
| [iOS/Swift] MVC (Model-View-Controller) (0) | 2021.10.20 |
| [iOS/Swift] KVO(Key-value observing) (0) | 2021.10.20 |
| [iOS/Swift] Notification, NotificationCenter (0) | 2021.10.20 |


